Monday, April 16, 2012

For all you Twi-Hards out there...

I know I am really going to anger a few people here, but I have to admit...I am not a huge fan of Twilight... Yes, I have read all the books, and I have seen the first 3 movies.  That was more than enough for me.  That said, my daughters are :) and at 14 and 13, I guess who can blame them- everyone else is.  Just not my cup of tea I guess. I have always been more of an action/suspense movie person, so maybe that's why... there are a few other problems that I have with it, but we'll just leave it at that.  What's even more "fun" is that my eldest daughter is a die hard Edward fan and the other is Team Jacob... yah. If you were to ask me, and if I were forced to choose... I would have to say I am, if anything, Team Emmett. I have always loved guys who are happy and funny, not so depressing and morose all the time (that and I may or may not think the actor who plays him is quite adorable... well, in his non vampire-mode anyway) But again... that's just me. Now what in the world does this have to do with sweets? Let me tell you :)

So my  daughter's birthday the last two years has involved making a rather large Twilight cake.  You can probably guess which one it is...
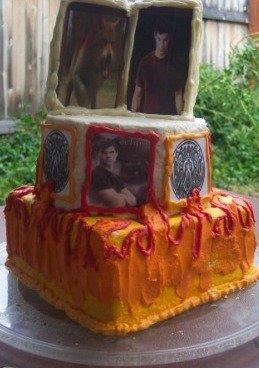


The "book" was made of cake and was leaning back on some skewers for support - these pictures are also laminated prints not edible. The flames on the side weren't exactly what I wanted, but overall, I was pretty proud of myself for the first try.  I will say this... YOU try finding pictures of "Jacob Black" with a shirt on... not very easy ... ;)

And of course I can't just do the same cake twice... so I had to mix it up a little bit :) And definitely improve on the technique for the second year.  I had a lot of things that I knew I could improve upon so I thought why not? For not liking Twilight I admit I definitely had fun planning and making this one.


See... this is part of the reason for the apology about my pictures... my camera phone really leaves much to be desired when it comes to taking pictures.  I really should go and get a decent camera... someday :) 
I absolutely loved the picture of the wolves- they were fan art, so not from the movie, but I really thought it was well done. It is a very ethereal sepia tone picture of wolves with a silhouette of wolves howling in the foreground and it says "I run with wolves".  I wish I had a better picture of it... All of these pictures were done on rice paper with edible ink. The book was standing straight up with straws up the middle for support instead of leaning back- and I liked that much better. I hand painted a forest on the bottom tier (this is all buttercream by the way) and the flames on the middle tier are hand painted too. I did make a major cake decorating faux pas (aka huge boo boo) though and forgot the supports between the tiers.  Hence the pretty obvious leaning of the cake... thank goodness it wasn't for a paying customer ;)!!
I think I will definitely encourage her to have a new theme for her party this year, I don't know if I could come up with another one :)
Please feel free to let me know what you think!!! :)
Hope you all have a most fantabulous rest of your week and Sweet Dreamz to you all :)

Hello- My name is Renee and I am a former Fondant hater.... ;)

I used to be of the opinion that fondant was pure evil. Sure, it looked pretty, but it was totally gross... a waste of time, and in a way kind of an easy way out.  Please don't hate me.  I have since changed my ways :).  
So about 6 months ago, I broke down and finally tried Marshmallow Fondant - and it is a-mazing.  While it is sweet, it tastes infinitely better than store bought, and also is MUCH cheaper (like I mentioned before, I am all about cheap ;))and looks just as beautiful.  I know there are a ton of recipes out there for it, but this is the one that I use- and it has worked pretty well for me so far.  Not that I won't change it in the future if I find a better one... 
Try it- I hope you will love it just as much as I do :) This recipe is adapted from a few different recipes on Cake Central.
Marshmallow Fondant
1 16 oz bag of marshmallows
2 TB water
1/4 cup Crisco (approximate)
powdered sugar ( approximately 2 lb... I have found that different batches used less, so go by feel not by measurements!) 
2 TB corn syrup (helps with pliability)
1 TB any flavor extract you wish :)
1/4 tsp popcorn salt- or salt ground in a coffee grinder (no I don't drink coffee- but I use the grinder for spices and other such emergencies :))  
2 TB Dream Whip (dry powder) You don't have to use this, but it adds a nice flavor...
(***Please note, if you are coloring the whole batch the same color, you can add it to the original melted marshmallow mixture before putting it in the sugar.)

Let me first say that if you have a KitchenAid or other comparable stand mixer- this is SO much easier :) Use the dough hook, and grease the bowl and the hook before making this recipe... trust me. 

Grease a large bowl (larger than you think you will need because the marshmallows do puff up when cooking) and add the marshmallows and water.  At this time, you can add any flavoring you wish... (vanilla is good, but try 1 tsp almond (clear), 1/2 tsp butter extract (clear), 1/2 tsp lemon extract and 1 tsp vanilla... I know it sounds funny but it's really good :)) Cook in the microwave at 45 second intervals stirring until completely melted. Remove and add the corn syrup. 

Sift half of the powdered sugar, salt and Dream Whip powder onto a piece of waxed paper.  Pour the powdered sugar (remember this is just half) in the greased stand mixer bowl, making a small well in the middle.  Take the marshmallow and add this mixture to the sugar.  

Turn on your stand mixer (LOW of course, unless you want to clean powdered sugar off your walls and ceilings...) and knead the mixture, adding more powdered sugar and the Crisco in small amounts as it is incorporated until you have a soft pliable ball. Pinch a small ball off and play with it- it should be soft and stretchy - be somewhat gentle.  You may take it out of the bowl before this point and knead it by hand so you can get the feel of it as well... I do this to make sure I dont add too much sugar. If you are not coloring the whole batch, you can split it and color the separate balls with your desired color- using gel food colors:)
Once you are done kneading, shape it into a ball and wrap it tightly in plastic wrap (put a very thin coat of shortening over the ball) It's best if you can store it overnight, but I have used it as soon as 3 hours after making it and it's ok.
** If you feel your motor is straining, you have added too much sugar so be careful... (I did blow my Kitchenaid making a batch last Christmas) 
(I used the same recipe with the two cakes in the previous "glitter" post just in case you were wondering :)) Here is the first cake I made with it- for two of the sweetest little 4 year old twins ever!  It is just like Playdough- only more fun- I didn't have a closer picture of the little firefighters in the bottom left corner, sadly, but the firefighters, the hose, and the fire hydrant and all of the decorations on the firetrucks are made of fondant :) One of the birthday boys came up and pointed saying "that's me!" There is nothing like seeing a child's face light up like that... it makes it all so worth it to me!


Hope you all enjoy- and as always Sweet Dreamz to you!!!
Renee :D

Tuesday, April 3, 2012

To Glitter or Not to Glitter... that is the question ;)

I thought I might pull in a few from the "archives" so to speak :) 

Personally, I am of the mindset that glitter makes absolutely everything more fun.  I totally LOVE glitter- it's just plain awesome. And ever since I first saw glitter gel and disco dust, I just knew I had to try it. OK... as far as the disco dust is concerned, before all you naysayers chime in ;) I do know that it is non-toxic, however, I also know that it is not officially ruled by the FDA as edible.  Which means to me that you shouldn't down huge amounts of it or use inordinate amounts of it everywhere.  For a little touch of bling here and there though... you just can't go wrong.  For example... here is a cake that I did for an adorable little 1 year old's birthday :) (and I am so sorry for the water marked table in the background...(hence all the pretty swirls and butterflies :))  it's a beautiful pedastal table that resembles the one my mom has- that we had planned to sand and refinish... someday...)


 Understated, yes, and unfortunately, thanks to my camera phone, you can't see the little bits of white rainbow disco dust that are on the "flowers" or the glitter gel that was painted on the butterflies.  All I did was take a paintbrush with the disco dust (dry) and shake it on so it was more random (and cleaner) than sprinkling with my hands.

This cake is 100% edible by the way :) Which is  how I do my cakes... I don't like to make anything little fingers can't reach up and grab and eat- safely anyway. The butterflies are rice paper- so while they are fully edible, they just aren't super tasty but the glitter gel helps the paper get pliable and stay so lifelike! So this cake is my example of what normal glitter usage would be. 
Now this one on the other hand...

I have to say, I did go a little glitter crazy here... It is definitely a little more than I would typically use, but still ok in the realm of decoration in my book.  This cake was made for my daughters friend's 13th Birthday- and it was close to Christmas- so how could I resist?  :) This was also the 2nd time making and using marshmallow fondant- and I have decided that I just love it.  Not only is it cheap, (I will tell you right now... I am cheap... frugal is the nice word) but it's fun to use and play with :) And I think it came out pretty darn cute. The inside -wish I would have taken a picture.. so sorry- was a white chocolate peppermint cake with candy cane buttercream.  YUM.

That said, I thought this would be a good time to share (and keep) my recipe for the white chocolate peppermint cake.  They make great cupcakes of course as well :)

White Chocolate Peppermint Cake
1 white cake mix (please feel free to just add the add ins to your regular homemade cake recipe!) with eggs etc as directed on box
1/2 c melted white chocolate
1 3 oz pkg white chocolate pudding mix (dry)
1/2 tsp peppermint extract
1 c chopped Hershey's Candy Cane Kisses (optional :))

Mix all together as directed  and put into a greased and floured 9*13 pan,  bake at 350 for 25-30 min (9*13 pan)

Candy Cane Buttercream
1/2 c butter or margarine
1/2 c Crisco Shortening (I like butter flavor, but you can use plain)
1 tsp vanilla
1/4 tsp peppermint extract
1 lb Powdered Sugar- sifted
2-3 TB milk as needed
14 mini candy canes, crushed to fine powder

Cream butter and Shortening together until smooth and fluffy.  Add vanilla and mix in thoroughly.  Add powdered sugar a cup at a time, until smooth and creamy.  Add milk until desired consistency, beating well until smooth and creamy after adding each TB.  Stir in candy cane dust- alternatively, you can sprinkle the candy cane dust over the frosting instead of mixing it in.It does add crunch so if you're a texture freak like me, you might just want to up the peppermint extract. Totally up to you :)
So my question to you is... do you use disco dust? Do you use it sparingly or go all out? Let me know! I would love to hear what you think!

For now though, have a stupendously fantabulous Tuesday! :D
Sweet Dreamz!!!
Renee :D

Sunday, March 25, 2012

Happy 4th BDay Destiny :)

Just made a cake today- and haven't had a chance to make one in a while so it was definitely a fun one!!! My neice, Destiny just turned 4 and apparently loves the Disney Show "Little Einsteins".  When my sister called me I admittedly had no idea what that show was... my youngest is 11 (that and we don't have the Disney Channel- so sue me ;)) so I had to look it up on the internet. I have to say the show looks pretty cute!

Here is the very happy little birthday girl with her cake :)


And that little blurb under the Happy 4th is supposed to say Birthday... however she comes up and says "I just want a taste..." (it's her cake after all!) So she went around saying "It says Happy 4th" Hey- we all knew we were there for her Birthday right? ;) And we call her Desi - and since I didn't have a whole lot of room on the tray cuz I always write too big;) I put Desi on the cloud just in case you were wondering what that blob was!

She is so funny... I had originally planned on printing out a color picture of the characters to put in the window- of course my printer decided to flip out (Murphy's Law anyone?) so sweet little Destiny decided to color some little black and white printouts to put on the window just so it would be perfect. So here is the final result :)  

Not too bad if I must say so myself. I had fun- and she loved it- and most of all she recognized it (phew ;)) so that's all that really matters to me!!! 

I will try to post pictures of creations I have made, and recipes very soon here... but for now :) Sweet Dreamz everyone and have a wonderful night!

Renee :D

Friday, March 23, 2012

Hello and Welcome!

Hi :) Welcome, and thanks for visiting! This whole thing been a long time coming- I have wanted to do this but was always too scared to really jump in.  I mean seriously... you see all the blogs out there that are just absolutely incredible... and think "I could never do that"!!! But I will try :) To be honest, my number one reason for this was seeing a friend's blog and using her tip of using a blog as a way to easily search recipes that I lose. (I hope I am not the only one who writes down a recipe that looks AMAZING... then loses it... am I?) But I thought it was also a way to share my love of all things sweet. Who knows, it may even get me going on kickstarting this business that has been my dream for so many years... But if it is just me logging on to find a recipe I lost, then it's worth it anyway ;)

A little about me... I began making candy probably around 23 years ago for Christmas for my family to give to our neighbors.  That started a uh... well let's be honest.. obsession with trying out new fun recipes to add to my tried and true loves.  Fast forward to about 6 years ago when I first started making homemade marshmallows (yes, you can make them- and they are much better than storebought... TRUST ME!) and I just couldn't help myself... I was hooked!

I have also been decorating cakes off and on for a better part of about 13 years now and I absolutely love it.  I mean loooooove it. I am nowhere near the caliber of all those greats out there- but I love watching people create amazing works of art with cake and learning their techniques. I am constantly looking for new ways to create fun cakes that you don't see in your grocery store bakery, and I love to make a cake that means something special or is something personal about each recipient, but the best part is always the looks on the recipient's face when they see the cake.  I love creating things to make people smile, and I hope that you enjoy seeing some of my creations and using some of my recipes to make your friends and family happy :) Because that's what it's all about... making people happy!!!

I do have to apologize in advance, especially since I know so many absolutely amazing photographers... my photos, especially those from years ago, definitely leave much to be desired... so there... I said it... I really am  sorry. Truly. (I will also apologize for my obsession with smiley faces... and the dot dot dot... even parentheses ... see? I need help.)

So since it is so late (or should I say early), I guess it really does fit... but I will sign off for now... Sweet Dreamz to you all- and to all a most fantabulous night!!
Please feel free to let me know what you think!!!